Chapter 7. Service Discovery
Kubernetes is a highly dynamic system where Pods are constantly created, destroyed, moved, and rescheduled.
This flexibility makes it easy to scale and automate applications, but it also creates a challenge:
how do components reliably find each other in such a changing environment?
Chapter 7 focuses on Service Discovery, which provides stable mechanisms for locating and connecting to application components even as Pods and nodes change over time.
Review:
Deployment(我要跑幾個、怎麼更新)
 └── ReplicaSet(確保數量正確)
      └── Pod(跑程式的最小單位)
           └── Container(你的 app)

Service(穩定入口 / 門牌)
 └── 指向一群 Pods(用 labels)

Node(機器)
 └── 跑 Pods
Node:通常先存在(雲端或本機已準備好)
↓
你寫 Deployment(你真正「建立」的東西)
↓
Deployment 建 Pod(你不用手動)
↓
Scheduler 把 Pod 放到 Node
↓
Service 提供穩定連線入口
Kind 架構
1️⃣ 用 Docker containers 假裝多台機器(Nodes)
2️⃣ 在這些 Nodes 裡跑 Kubernetes
3️⃣ Kubernetes 再在 Nodes 裡跑 Pods
4️⃣ Pods 裡跑你的 containers
Service Discovery – Introduction
-
What Is Service Discovery
- Service discovery refers to the set of problems and solutions related to finding which processes are listening on which addresses for which services.
- A service-discovery system helps clients locate services quickly and reliably.
-
Characteristics of a Good Service-Discovery System
- Low latency: clients are updated quickly when service information changes.
- Reliability: clients can consistently find the correct service endpoints.
- Rich service definitions: services may expose multiple ports or additional metadata.
-
DNS as Traditional Service Discovery
- DNS is the traditional service-discovery mechanism on the internet.
- It is designed for stable environments with aggressive caching.
- DNS works well for the internet, but is not well suited for highly dynamic systems like Kubernetes.
api.example.com → 1.2.3.4
-
Limitations of DNS in Dynamic Environments
- Many clients (for example, Java by default) resolve DNS once and cache forever.
- Even with short TTLs, there is an unavoidable delay before clients see updates.
- DNS responses are limited in:
- Amount of information
- Number of IP addresses returned
- DNS A records often break down beyond 20–30 IP addresses.
- SRV records solve some issues but are difficult to use in practice.
-
DNS Load Balancing Limitations
- Clients typically select the first IP address returned by DNS.
- DNS relies on record order randomization or round-robin behavior.
- This approach is not a substitute for purpose-built load balancing.
-
Key Takeaway
-
Traditional DNS-based discovery is insufficient for Kubernetes’ frequently changing, highly dynamic service landscape.
-
Kubernetes requires a more specialized service-discovery mechanism.
-
The Service Object
-
Service as the Foundation of Service Discovery
- Real service discovery in Kubernetes begins with the Service object.
- A Service is essentially a named label selector.
- It groups a set of Pods and provides a stable way to access them.
- In addition to discovery, Services also provide networking and load-balancing features.
-
Service Creation with kubectl expose
- Just as
kubectl run(or create deployment) is a convenient way to create Deployments,kubectl exposeis a convenient way to create a Service. - For now, a Deployment can be thought of as an instance of a microservice.
- Just as
-
Creating Deployments
$ kubectl create deployment alpaca-prod \
  --image=gcr.io/kuar-demo/kuard-amd64:blue \
  --port=8080

$ kubectl scale deployment alpaca-prod --replicas 3

$ kubectl create deployment bandicoot-prod \
  --image=gcr.io/kuar-demo/kuard-amd64:green \
  --port=8080

$ kubectl scale deployment bandicoot-prod --replicas 2
- Exposing Deployments as Services
kubectl exposecreates a Service from an existing Deployment.- It automatically extracts:
- The label selector
- The relevant ports (8080 in this example)
$ kubectl expose deployment alpaca-prod
$ kubectl expose deployment bandicoot-prod
- Listing Services
$ kubectl get services -o wide

NAME             CLUSTER-IP        PORT(S)     SELECTOR
alpaca-prod      10.115.245.13     8080/TCP    app=alpaca
bandicoot-prod   10.115.242.3      8080/TCP    app=bandicoot
kubernetes       10.115.240.1      443/TCP     <none>
-
Built-in kubernetes Service
- The
kubernetesService is created automatically. - It allows applications running inside the cluster to locate and communicate with the Kubernetes API server.
- The
-
Selectors and ClusterIP
- The SELECTOR column shows which Pods each Service targets.
- Each Service is assigned a ClusterIP, which is a virtual IP address.
- Traffic sent to the ClusterIP is load balanced across all Pods that match the selector.
-
Interacting with a Service Using Port Forwarding
- Port forwarding allows local access to a Pod for testing or debugging.
$ ALPACA_POD=$(kubectl get pods -l app=alpaca \
  -o jsonpath='{.items[0].metadata.name}')

$ kubectl port-forward $ALPACA_POD 48858:8080
- Key Takeaway
- A Service provides a stable network endpoint for a dynamic set of Pods.
- Clients interact with the Service, not individual Pod IPs.
Service DNS
-
Stable DNS for Services
- Each Service is assigned a stable ClusterIP, which makes it suitable to be associated with a DNS name.
- Because the ClusterIP does not change, problems caused by DNS caching are largely avoided.
-
Kubernetes DNS Service
- Kubernetes provides an internal DNS service to all Pods in the cluster.
- This DNS service is installed as a system component when the cluster is created.
- The DNS service itself is managed by Kubernetes and runs inside the cluster.
- It maps Service names to their corresponding ClusterIPs.
-
Service DNS Records
- Each Service receives a DNS A record that resolves to its ClusterIP.
- Example DNS query result:
alpaca-prod.default.svc.cluster.local → 10.115.245.13
-
Service DNS Name Structure
alpaca-prod: Service namedefault: Namespacesvc: Indicates the object is a Servicecluster.local: Cluster’s base domain (configurable by administrators)
-
Using Service Names
- Within the same namespace, a Service can be accessed using just its name
(e.g.,
alpaca-prod). - Services in other namespaces can be accessed using
service-name.namespace. - The fully qualified domain name (FQDN) can also be used:
service-name.namespace.svc.cluster.local.
- Within the same namespace, a Service can be accessed using just its name
(e.g.,
-
Key Takeaway
- Kubernetes DNS enables reliable service discovery by providing stable, name-based access to Services, independent of Pod IP changes.
Readiness Checks
-
Purpose of Readiness Checks
- When a Pod first starts, it may not be ready to handle traffic due to initialization.
- A readiness check allows Kubernetes to determine when a Pod is ready to receive requests.
- Services only send traffic to Pods that are marked as ready.
- P.S. If there is no readinessProbe settings, that pod will always be thought ready.
-
Configuring a Readiness Probe
- Readiness checks are defined at the Pod level inside the Deployment’s Pod template.
- In this example, an HTTP readiness probe is added to the alpaca-prod Deployment.
readinessProbe:
  httpGet:
    path: /ready
    port: 8080
  periodSeconds: 2
  initialDelaySeconds: 0
  failureThreshold: 3
  successThreshold: 1
Review:
apiVersion: apps/v1
kind: Deployment
metadata:
  name: alpaca-prod
spec:
  replicas: 3
  selector:
    matchLabels:
      app: alpaca
  template:
    metadata:
      labels:
        app: alpaca
    spec:
      containers:
      - name: alpaca-prod
        image: gcr.io/kuar-demo/kuard-amd64:blue
        ports:
        - containerPort: 8080
        readinessProbe:
          httpGet:
            path: /ready
            port: 8080
          periodSeconds: 2
          initialDelaySeconds: 0
          failureThreshold: 3
          successThreshold: 1
-
How the Readiness Probe Works
- Kubernetes sends an HTTP GET request to
/readyon port 8080. - The check runs every 2 seconds.
- After 3 consecutive failures, the Pod is marked NotReady.
- After 1 successful check, the Pod is marked Ready again.
- Kubernetes sends an HTTP GET request to
-
Effect on Traffic Routing
- Only Pods in the Ready state are included in a Service’s endpoints.
- When a Pod becomes NotReady, it is automatically removed from the Service’s endpoint list.
- When it becomes Ready again, it is added back.
-
Observing Readiness Behavior
- Updating the Deployment causes Pods to be recreated.
- Port forwarding must be restarted after Pods are recreated.
- The
kubectl get endpoints --watchcommand can be used to observe how Pods are added to or removed from a Service in real time.
-
Operational Benefits
- Readiness checks allow unhealthy or overloaded Pods to stop receiving traffic.
- They support graceful shutdown by letting a Pod finish existing requests before being removed from service.
-
Key Takeaway
- Readiness checks give Kubernetes a safe and automatic way to control which Pods receive traffic, improving reliability and stability.
Looking Beyond the Cluster
- Problem: Exposing Services Outside the Cluster
- So far, services have only been reachable inside the Kubernetes cluster.
- Pod IPs are typically internal-only and cannot be accessed from outside.
- To accept external traffic, Kubernetes needs an exposure mechanism.
外部流量
  ↓
任何一台 Node 的 IP:NodePort
  ↓
Service
  ↓
Pods(負責實際處理)
- NodePort: Extending a Service Outside the Cluster
- A NodePort Service extends a normal Service.
- In addition to a ClusterIP, Kubernetes:
- Chooses a port (or uses one specified by the user)
- Opens that port on every Node in the cluster
- Traffic sent to:
<any-node-ip>:<nodePort>- is forwarded to the Service
- then load-balanced to matching Pods
Edit the yaml of service alpaca-prod
$ kubectl edit service alpaca-prod
type: ClusterIP
⬇️ 改成
type: NodePort
- Kubernetes automatically assigns a NodePort
- Typically in the range 30000–32767
$ kubectl describe service alpaca-prod

Name: alpaca-prod
Namespace: default
Labels: app=alpaca
Annotations: <none>
Selector: app=alpaca
Type: NodePort
IP: 10.115.245.13
Port: <unset> 8080/TCP
NodePort: <unset> 32711/TCP
Endpoints: 10.112.1.66:8080,10.112.2.104:8080,10.112.2.105:8080
Session Affinity: None
No events.
-
What kubectl describe service Shows
- Service type:
NodePort - ClusterIP: internal virtual IP
- NodePort: externally reachable port on every Node
- Endpoints: Pod IPs and ports that receive traffic
- Service type:
-
Accessing the Service
- Direct access:
<node-ip>:<nodePort>
- SSH tunneling example(If it is cloud):
- Forward local port to NodePort
- Access service via
http://localhost:<local-port>
- Direct access:
$ ssh <node> -L 8080:localhost:32711
-
Load Balancing Behavior
- Each request to the NodePort:
- Is randomly routed to one of the Pods
- Provides basic load balancing
- Reloading the page may hit different Pods each time
- Each request to the NodePort:
-
Key Takeaway
- NodePort exposes a Service on every Node
- It provides a simple, portable way to allow external traffic
- Clients interact with Nodes, not Pods
- Kubernetes handles routing and load balancing automatically
Load Balancer Integration
ClusterIP   → 只能 cluster 內用
NodePort    → 可以從 Node 進來
LoadBalancer → 給整個網路 / 網際網路用
-
LoadBalancer Service Type
LoadBalancerbuilds on top of NodePort.- In addition to creating:
- a ClusterIP
- a NodePort
- Kubernetes also asks the cloud provider to:
- create an external load balancer
- route traffic from that load balancer to the Nodes in the cluster
-
How It Works
- Client traffic flow:
- External Load Balancer (public IP or hostname)
- → NodePort on cluster Nodes
- → Service (ClusterIP)
- → matching Pods
- Most managed Kubernetes services (GKE, EKS, AKS) support this automatically.
- Client traffic flow:
-
Creating a LoadBalancer Service
- Edit an existing Service:
- Set
spec.type: LoadBalancer
- Set
- Kubernetes will:
- provision a cloud load balancer
- assign an EXTERNAL-IP (or hostname)
- The EXTERNAL-IP may initially show
<pending>while the cloud resource is created.
- Edit an existing Service:
$ kubectl edit service alpaca-prod

type: ClusterIP
⬇️ 改成
type: LoadBalancer
$ kubectl describe service alpaca-prod

Name: alpaca-prod
Namespace: default
Labels: app=alpaca
Selector: app=alpaca
Type: LoadBalancer
IP: 10.115.245.13
LoadBalancer Ingress: 104.196.248.204
Port: <unset> 8080/TCP
NodePort: <unset> 32711/TCP
Endpoints: 10.112.1.66:8080,10.112.2.104:8080,10.112.2.105:8080
Session Affinity: None
Events:
  FirstSeen ... Reason Message
  --------- ... ------ -------
  3m ... Type NodePort -> LoadBalancer
  3m ... CreatingLoadBalancer Creating load balancer
  2m ... CreatedLoadBalancer Created load balancer
EXTERNAL-IP: 104.196.248.204
http://104.196.248.204:8080
-
kubectl describe service Output
- Shows:
- ClusterIP (internal virtual IP)
- NodePort (still exists underneath)
- LoadBalancer Ingress (public IP or DNS name)
- Endpoints (Pod IPs receiving traffic)
- Events indicate:
- transition from NodePort → LoadBalancer
- creation of the cloud load balancer
- Shows:
-
Security Warning
- A Service of type
LoadBalanceris publicly accessible by default. - Only use this for services that are safe to expose to the internet.
- Additional security considerations are required (firewalls, auth, TLS).
- A Service of type
-
Cloud-Specific Behavior
- Load balancer implementation depends on the cloud provider.
- Some clouds return:
- an IP address (e.g., GCP)
- a DNS hostname (e.g., AWS ELB)
- Provisioning may take several minutes.
-
Internal Load Balancers
- Sometimes services should be exposed only inside a private network.
- This is done via Service annotations (cloud-specific).
- Examples:
- Azure: service.beta.kubernetes.io/azure-load-balancer-internal: "true"
- AWS: service.beta.kubernetes.io/aws-load-balancer-internal: "true"
- Alibaba Cloud: service.beta.kubernetes.io/alibaba-cloud-loadbalancer-address-type: "intranet"
- Google Cloud: cloud.google.com/load-balancer-type: "Internal"
-
Example Internal LoadBalancer Configuration
- Add an annotation to the Service metadata(Service YAML):
...
metadata:
  name: some-service
  annotations:
    service.beta.kubernetes.io/azure-load-balancer-internal: "true"
...
Review
需求                  正確選擇
--------------------  --------------------------
只給 cluster 內用     ClusterIP
對外公開              LoadBalancer / Ingress
內網但非 cluster      Internal LoadBalancer
教學 / 測試           NodePort
- Key Takeaways
LoadBalanceris the most convenient way to expose services externally.- It relies heavily on cloud-provider integration.
- Annotations are used to extend or customize load balancer behavior.
- NodePort and ClusterIP still exist underneath the LoadBalancer abstraction.
Advanced Details – Endpoints
-
Why Endpoints Exist
- Kubernetes is designed to be extensible and support advanced integrations.
- Some applications need to discover service backends without using a ClusterIP.
- For this purpose, Kubernetes provides a separate object called Endpoints.
-
What Is an Endpoints Object
- For every Service, Kubernetes automatically creates a corresponding Endpoints object.
- The Endpoints object contains:
- The actual Pod IP addresses
- The ports those Pods are listening on
- It represents the real, current backends for a Service.
$ kubectl describe endpoints alpaca-prod

  Name: alpaca-prod
  Namespace: default
  Labels: app=alpaca
  Subsets:
  Addresses: 10.112.1.54,10.112.2.84,10.112.2.85
  NotReadyAddresses: <none>
  Ports:
  Name Port Protocol
  ---- ---- --------
  <unset> 8080 TCP
  No events.
-
Relationship Between Service and Endpoints
- Service:
- Defines which Pods belong together (via selectors)
- Provides a stable abstraction
- Endpoints:
- Lists the current IPs of Pods matching the Service selector
- Updates dynamically as Pods are added, removed, or replaced
- Service:
-
Watching Endpoints Changes
$ kubectl get endpoints alpaca-prod --watch

  NAME ENDPOINTS AGE
  alpaca-prod 10.112.1.54:8080,10.112.2.84:8080,10.112.2.85:8080 1m
Another Terminal:
$ kubectl delete deployment alpaca-prod
$ kubectl create deployment alpaca-prod \
--image=gcr.io/kuar-demo/kuard-amd64:blue \
--port=8080
$ kubectl scale deployment alpaca-prod --replicas=3
Go back:
  NAME ENDPOINTS AGE
  alpaca-prod 10.112.1.54:8080,10.112.2.84:8080,10.112.2.85:8080 1m
  alpaca-prod 10.112.1.54:8080,10.112.2.84:8080 1m
  alpaca-prod <none> 1m
  alpaca-prod 10.112.2.90:8080 1m
  alpaca-prod 10.112.1.57:8080,10.112.2.90:8080 1m
  alpaca-prod 10.112.0.28:8080,10.112.1.57:8080,10.112.2.90:8080 1m
-
Why This Matters
- Endpoints provide low-level service discovery based on real Pod IPs.
- Advanced clients can:
- Query the Kubernetes API directly
- Watch for endpoint changes
- Perform their own load balancing or routing
-
Limitations
- Most existing applications are not designed to:
- watch APIs
- handle rapidly changing IP addresses
- These applications typically expect stable IPs or DNS names.
- Most existing applications are not designed to:
-
Key Takeaway
- Services offer a stable abstraction.
- Endpoints expose the dynamic reality behind that abstraction.
- Endpoints are powerful for Kubernetes-native applications, but less suitable for legacy systems.
Advanced Details – Manual Service Discovery
-
Core Idea
- Kubernetes Services are built on top of label selectors over Pods.
- Because of this, it is possible to perform basic service discovery manually
using the Kubernetes API or
kubectl, without creating a Service object.
-
Listing Pods with IPs
$ kubectl get pods -o wide --show-labels

  NAME ... IP ... LABELS
  alpaca-prod-12334-87f8h ... 10.112.1.54 ... app=alpaca
  alpaca-prod-12334-jssmh ... 10.112.2.84 ... app=alpaca
  alpaca-prod-12334-tjp56 ... 10.112.2.85 ... app=alpaca
  bandicoot-prod-5678-sbxzl ... 10.112.1.55 ... app=bandicoot
  bandicoot-prod-5678-x0dh8 ... 10.112.2.86 ... app=bandicoot
- Filtering Pods with Labels
$ kubectl get pods -o wide --selector=app=alpaca

  NAME ... IP ...
  alpaca-prod-3408831585-bpzdz ... 10.112.1.54 ...
  alpaca-prod-3408831585-kncwt ... 10.112.2.84 ...
  alpaca-prod-3408831585-l9fsq ... 10.112.2.85 ...
-
What This Gives You
- You now know:
- Which Pods belong to an application
- The exact IP addresses to contact
- This is the most basic form of service discovery.
- You now know:
-
Limitations
- Pod IPs are ephemeral and change as Pods are recreated.
- Clients must:
- Re-query Kubernetes frequently
- Correctly maintain and apply consistent labels
- Keeping label usage synchronized across systems is error-prone.
-
Why Services Exist
- The Service object was created to:
- Encapsulate label selectors
- Provide a stable abstraction over changing Pod IPs
- Remove the burden of manual discovery from applications
- The Service object was created to:
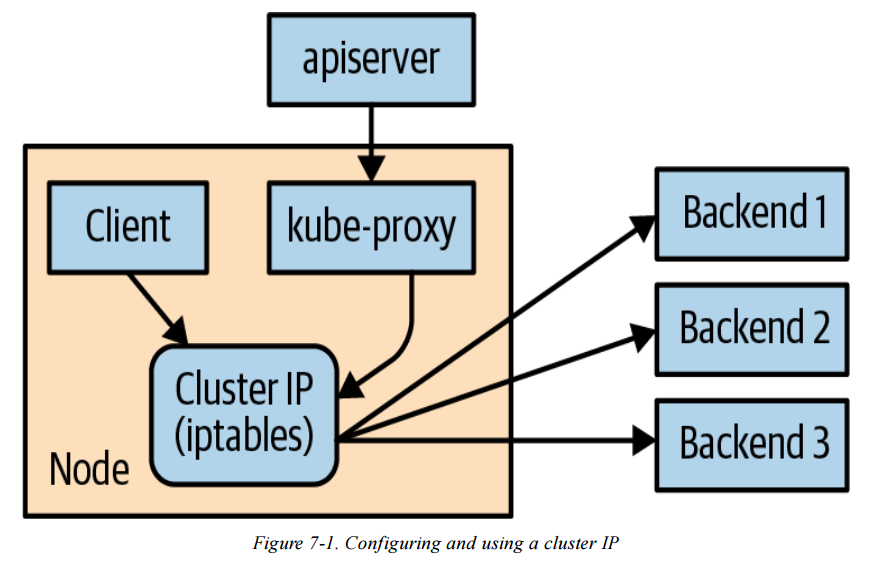
Advanced Details – kube-proxy and Cluster IPs
- Cluster IPs
-
A Cluster IP is a stable virtual IP
-
It is used to load balance traffic across all Pod endpoints behind a Service
-
A Cluster IP is not a real IP assigned to any Node or Pod
-
Service (ClusterIP: 10.115.245.13)
  selector: app=alpaca
        ↓
Pod A (10.112.1.54)
Pod B (10.112.2.84)
Pod C (10.112.2.85)
-
Role of kube-proxy
- kube-proxy is a component that runs on every Node
- It watches Services and Endpoints via the Kubernetes API Server
- kube-proxy programs iptables rules in the Node’s kernel to rewrite packet destinations
- Traffic sent to a Cluster IP is redirected to one of the Service’s Pod endpoints
-
Dynamic Updates
- When:
- Pods are added or removed
- Pod readiness checks fail or recover
- kube-proxy automatically updates iptables rules
- This ensures traffic is only sent to currently ready Pods
- When:
-
Cluster IP Assignment
- Cluster IPs are typically assigned automatically by the API Server when a Service is created
- Users may optionally specify a Cluster IP
- Once assigned, a Cluster IP cannot be changed without deleting and recreating the Service
Internet
   |
   v
Cloud Load Balancer (L4 / L7)        ← 雲端供應商(GCP / AWS / Azure)
   |
   v
NodeIP : NodePort                   ← 每一台 Node 都開同一個 NodePort
   |
   v
Service (ClusterIP, 虛擬 IP)         ← Kubernetes Service
   ^
   |
service-name (DNS)
   |
   v
kube-proxy (iptables / ipvs)        ← 真正做 Load Balancing 的地方
   |
   v
Pod A        Pod B        Pod C      ← 實際跑應用程式的 Pods
- Service IP Range
- Cluster IPs are allocated from a predefined Service IP range
- This range is configured on the API server using: --service-cluster-ip-range
- The Service IP range must:
- Not overlap with Node or Docker bridge IP ranges
- Contain any manually requested Cluster IPs that are not already in use
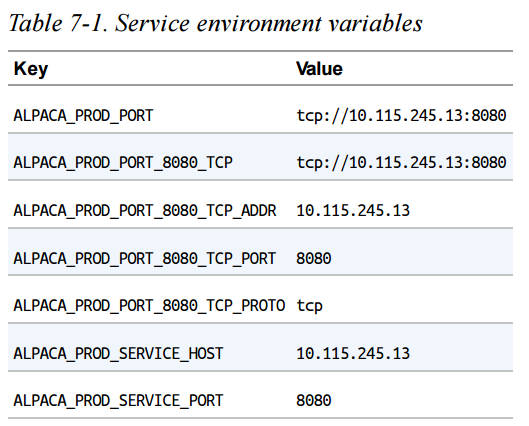
Advanced Details – Cluster IP Environment Variables(replaced by DNS)
-
What This Is
- Kubernetes can inject Service information as environment variables into Pods when they start.
- This is an older service discovery mechanism, largely replaced by DNS.
-
How It Works
- When a Pod starts, Kubernetes automatically adds environment variables for each Service in the same namespace.
- These variables contain the Service’s ClusterIP and port.
$ BANDICOOT_POD=$(kubectl get pods -l app=bandicoot \
-o jsonpath='{.items[0].metadata.name}')
$ kubectl port-forward $BANDICOOT_POD 48858:8080
Go to http://localhost:48858:
-
How Applications Use It
- Applications can connect to a Service using:
- SERVICE_HOST
- SERVICE_PORT
- No DNS lookup is required.
- Applications can connect to a Service using:
-
Limitations
- Creation order matters:
- Services must exist before Pods start
- Otherwise, environment variables will not be injected
- Makes deployments more complex for large systems
- Less flexible and harder to reason about than DNS
- Creation order matters:
-
Key Takeaway
- Environment variables for Services still exist for legacy reasons
- DNS-based service discovery is preferred because it is dynamic, order-independent, and easier to manage
Connecting to Resources Outside of a Cluster
-
Why This Is Needed
- Real-world systems often mix:
- Kubernetes-based (cloud-native) applications
- Legacy or on-premise applications
- Kubernetes must sometimes connect to services that live outside the cluster
- This area is still evolving and has multiple patterns
- Real-world systems often mix:
-
Selector-less Services
- Kubernetes can create a Service without a selector
- This allows Kubernetes DNS to work normally while traffic is sent to an external IP
-
How It Works
- Remove
spec.selectorfrom the Service - Kubernetes will:
- Create the Service
- NOT automatically create Endpoints
- You must manually define an Endpoints object
- Remove
Example: External Database Service
apiVersion: v1
kind: Service
metadata:
  name: my-database-server
spec:
  ports:
    - port: 1433
- Manual Endpoints
- Endpoints contain fixed IP addresses (e.g., an on-prem database or legacy server)
- Usually added once if the IP is stable
- Must be updated manually if the IP changes
apiVersion: v1
  kind: Endpoints
  metadata:
    # This name must match the name of your service
    name: my-database-server
  subsets:
    - addresses:
      # Replace this IP with the real IP of your server
      - ip: 1.2.3.4
    ports:
      # Replace this port with the port(s) you want to expose
      - port: 1433
- Result
- Pods can access the external resource using:
- Service DNS name (e.g.
my-database-server)
- Service DNS name (e.g.
- Kubernetes handles discovery
- Network traffic flows outside the cluster
- Pods can access the external resource using:
Review normal service yaml:
apiVersion: v1
kind: Service
metadata:
  name: alpaca-prod
spec:
  type: ClusterIP          # 預設就是 ClusterIP
  selector:                # 🔹 關鍵差異:有 selector
    app: alpaca             # 會選到 labels app=alpaca 的 Pods
  ports:
    - name: http
      port: 8080            # Service 對外(cluster 內)暴露的 port
      targetPort: 8080      # Pod container 實際 listening 的 port
- Key Takeaway
- Selector-less Services allow Kubernetes DNS to represent external, non-Kubernetes resources
- This enables smooth integration between:
- Kubernetes clusters
- Legacy systems
- On-premise infrastructure
Connecting External Resources to Services Inside a Cluster
-
Purpose
- Enable systems outside Kubernetes to access Services running inside a cluster
-
Internal Load Balancer (Best Option)
- Uses cloud provider support
- Exposes a fixed private IP inside the VPC
- External systems connect via standard DNS
- Simplest and most reliable solution when available
-
NodePort Service (Fallback Option)
- Exposes the Service on a port on every Node
- External traffic can be routed by:
- Physical / hardware load balancers
- DNS-based load balancing across Nodes
- Used when internal load balancers are not supported
-
Advanced / Last-Resort Solutions
- Run kube-proxy outside the cluster
- Use third-party tools (e.g., HashiCorp Consul)
- High complexity and operational risk
- Typically for on-premise environments only
-
Key Takeaway
- Prefer internal load balancers
- Use NodePort if needed
- Avoid complex integrations unless absolutely necessary
Cleanup – Removing Deployments
- Cleaning Up Resources
- All Deployments created in this chapter can be removed at once using:
$ kubectl delete services,deployments -l app